
I’d love to be one of those people with an immaculately clean, magazine-worthy studio, but I’m finally coming to grips with the fact that I’m just not. I don’t *want* to be this way, I promise.
Case in point: my current workbench, which you can see at the top of this post.
The reason for my current mess is that I’ve been trying hard to avoid distraction, get my butt in my studio chair more, and work on new pieces. That involves a lot of wax carving (very messy but very fun), a technique where I carve exactly the piece I want using a block of wax and files, make a mold of the wax, then cast in metal.
I just finished carving a ring I've been dreaming of for a while, a chunky brass ring with a beautiful, deep blue lapis lazuli, and wanted to share the process of making that first wax model with you:
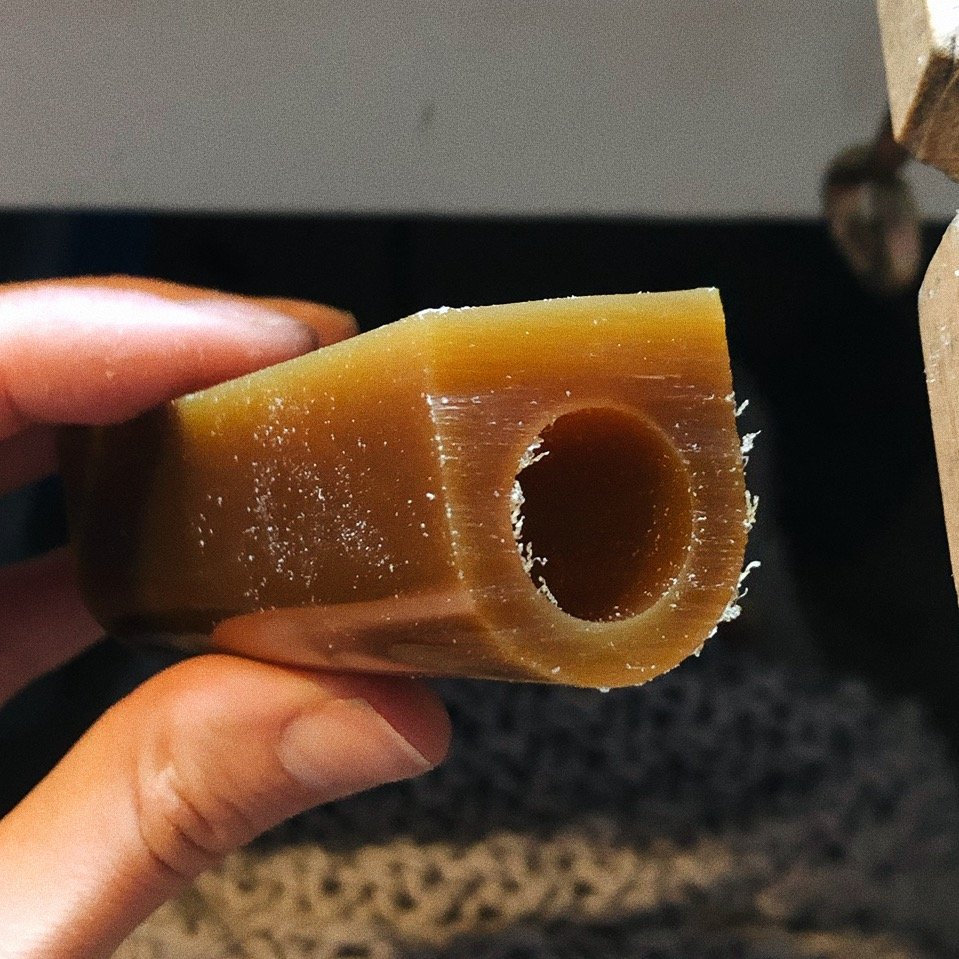
A wax tube specially made for carving rings.

The roughly carved shape with a space for the stone.
This ring started as a long wax tube with a hole running through the center. I cut off a section exactly the size I needed, and carved the center hole bigger to fit a finger. I had a true-to-size sketch with exact measurements already figured out, so I carved away more wax from the outside based on those numbers (I hate math, this is not my favorite part) until the whole thing was a rough, geometric version of the ring I had in mind.
Next I traced the oval stone on the flat top of the wax, and dug that shape out to give the stone a place to sit. I carved a smaller oval straight through the top of the ring — you won’t see it when the stone is in place, but it will help the ring feel less heavy and clunky when you’re wearing it.

Look! It’s actually a ring now!

Making wax beads that’ll get attached to the ring.
Next I carved the contours of the ring, leaving a border around where the stone will go. It’s a slow process — carve, carve, check how it’s looking, repeat 30 more times — but this is when it *really* starts looking like a ring.
Happy with the shape, I moved onto making tiny wax beads. I cut up small bits of wax wire and used a heat pen to ball them up into little spheres. I made little divots along the edge of the ring where they’d eventually go, and attached them with more heat, melting their surfaces together.

Ta-da! The finished ring model.

A cast silver model vs. a wax model.
Lastly I cut more wire to make prongs that will hold the stone in place, and used the heat pen to attach them to the top. I checked to make sure the stone would still fit, and voila! She’s ready for casting. Here’s a photo of the finished wax next to an earlier version I already had cast so you can see the before and after.
The whole process took about 3 1/2 hours, and it’s so worth it to get that slightly irregular, hand-wrought feeling that I love in jewelry. Now she’s off to be cast in silver, made into a mold, and then (if I’m happy with how she’s looking) cast for real in brass and set with the lapis.
I’m working out more pieces this same way, and can’t wait to share the final results with you!